

Hello! It’s blog time. What inspired me this week was how to make awesome party favors for my son’s 4th birthday party. As I was brainstorming, I was trying to figure out what gifts I could give all the kids that was actually useful. I usually give the common plastic play toys, stuffed animals, coloring books, candy, and all the other random accessories that will fit into a goody bag. I wanted to do something DIFFERENT this time. Since I just launched my Etsy shop 1 week ago, I figured I should personalize something for the kids to perhaps help promote my shop. Since I didn’t know all the kids sizes, I decided on making personalized baseball toddler hats. Ding ding ding!

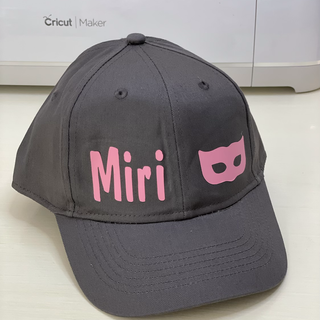
I found some adorable baseball hats through my wholesaler and thought this was the best idea for party favors! Since my son is into super heroes right now, I decided to go with a super hero theme. I logged onto cricut design space and found a lightening bolt and a mask to go with everyone’s name.
youth baseball cap https://amzn.to/347onU1

After creating your design, measure the baseball cap and decide where you want to place your iron ons. It’s best to avoid seams and find the flattest surface possible. I decided to put the name on one half of the cap and a picture on the other half. I made my names 1.5 inches high and 2.5 inches wide for my toddler hat. However, next time I would make the name smaller. I made the lightening bolt and mask a little smaller than the name.

I made 16 designs with various colors to go with four different color hats. I cut out one design first to test out the product which I highly suggest doing if you plan on making multiple hats. After weeding the cricut brand everyday iron on, I looked up the recommended easy press 2 heat guide instructions on the internet. I picked cotton canvas and it stated to:
Preheat for 5 seconds
Iron on at 315 degrees for 15 seconds with a FIRM press on a towel.
Cool peel

easy press 2 https://amzn.to/3ynztlL
I can’t stress the importance of these instructions. Before preheating, I used a lint remover to remove any access lint. I then stuffed the inside of the hat with a towel to create a FLAT surface when I used my easy press. I then preheated the hat for 5 seconds. I placed my design where I wanted it, avoiding seams and creases and pressed firmly for 15 seconds with the small easy press 2 machine. Press firmly and make sure the surface is as flat as possible but also try not to bend the shape of the hat. It’s not the easiest object to iron on. After letting the iron on cool completely, I gently removed the outer liner. On some hats I had to be very gentle and even press down on the corners of the vinyl or go over it again with the easy press mini. Overall, this was a great project and the kiddos loved them! Here are the end results! Comment with any questions below and tag me with your final product! Happy crafting.


Materials you can buy from Amazon
youth baseball cap https://amzn.to/347onU1
easy press 2 9x9 https://amzn.to/3hIp3qN
Easy press 2 mini https://amzn.to/3hFq0QR
cricut maker https://amzn.to/3wp4949
Cricut iron on vinyl https://amzn.to/3v4y4hM
Comments